Home Blog Page 34

Mastering the Art of the Eritrean Zigni Recipe: A Culinary Journey into Eritrea

As a passionate gastronome, there’s nothing more exciting than exploring a fresh culinary landscape. Today, our gastronomic adventure takes us to the vibrant, flavorful, and diverse world of Eritrean cuisine. Nestled in the Horn of Africa, Eritrea boasts a culinary tradition steeped in history, culture, and an abundance of locally sourced ingredients.

Eritrean cuisine is a delightful blend of African, Italian, and Middle Eastern influences, resulting in a rich tapestry of flavors that are as diverse as the people who call this country home. The Eritrean table is a testament to the country’s resilience, resourcefulness, and unwavering love for good food.

The cornerstone of Eritrean cuisine is injera, a sourdough-risen flatbread with a slightly spongy texture, typically served with various stews and sauces. However, the star of today’s culinary journey is the Eritrean Zigni, a hearty and spicy meat stew that embodies the spirit of Eritrean cuisine.

The Eritrean Zigni: An Overview

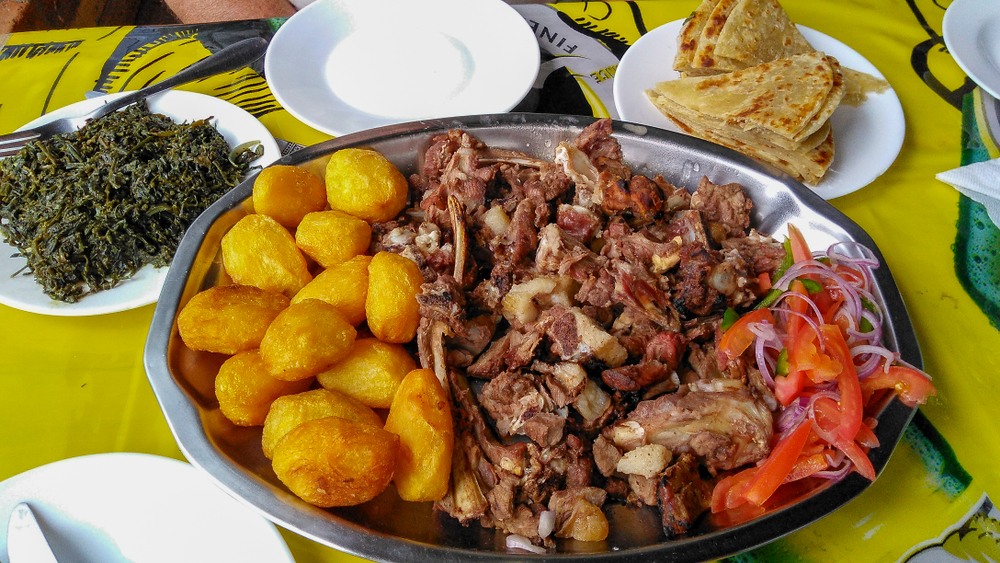
At the heart of many traditional Eritrean meals is Zigni, a rich, flavorful meat stew that is synonymous with comfort and hospitality in Eritrea. The Eritrean Zigni recipe is a delightful fusion of carefully selected ingredients and a slow-cooking process that brings out an exquisite depth of flavor.

Zigni is typically made with beef, lamb, or goat, simmered in a robust sauce of berbere spice, tomatoes, onions, and garlic. The result is a spicy, aromatic stew that is a feast for the senses. Its robust flavors and hearty texture make it a staple dish in Eritrean households, particularly during celebratory occasions.

The Eritrean Zigni recipe is a testament to Eritrea’s cultural diversity, with variations of the dish reflecting the unique tastes and culinary influences of different regions. No matter the version, the essence of Zigni remains the same – a comforting, delicious dish that brings people together.

Ingredients, quantities and Preparation: Mastering the Eritrean Zigni Recipe

The beauty of the Eritrean Zigni recipe lies in its simplicity. The ingredients are straightforward, readily available, and when combined, create a symphony of flavors. While the key to mastering this recipe lies in the proper balance of spices and a careful, slow-cooking process, it begins with sourcing the right ingredients.

To prepare Zigni, you’ll need tender cuts of meat (beef, lamb, or goat), berbere spice, tomatoes, onions, garlic, ginger, vegetable oil, salt, and injera for serving. Berbere, the lifeblood of many Eritrean dishes, is a spicy mixture composed mainly of chili peppers, garlic, ginger, basil, korarima, rue, ajwain, radhuni, nigella, and fenugreek.

The quantities of these ingredients can vary based on personal preference or regional variations. However, a traditional Eritrean Zigni recipe typically calls for a 1:1 ratio of meat to onions, an ample amount of berbere spice for heat, and a generous amount of oil to help the flavors meld together.

A Step-by-step Guide on Cooking Eritrean Zigni

The process of cooking Zigni is as fascinating as the dish itself. It requires patience, attention to detail, and an appreciation for the slow transformation of simple ingredients into a complex, flavorful stew.

First, the onions are finely chopped and sautéed until they are golden brown. This process, known as “sweating” the onions, helps to release their natural sugars and enhances the overall flavor of the dish. Next, the berbere spice is added to the onions, along with the minced garlic and ginger. The mixture is then fried until the spices are well blended and fragrant.

The meat, cut into bite-sized pieces, is then added to the pot. It is cooked until it becomes tender and absorbs the flavors of the spices. The tomatoes are then added, along with enough water to cover the meat. The stew is then simmered on low heat for several hours until the meat is tender and the flavors have melded together to create a rich, flavorful sauce.

The final result is a spicy, aromatic stew that is typically served with injera, a sourdough-risen flatbread that is a staple in Eritrean cuisine.

Tips and Tricks for Perfect Zigni Every Time

While the Eritrean Zigni recipe may seem straightforward, achieving the perfect balance of flavors requires a few tips and tricks. First, it’s essential to use fresh, high-quality ingredients for the best results. The quality of your meat, spices, and vegetables can significantly impact the flavor of your Zigni.

Second, the key to a flavorful Zigni lies in the slow-cooking process. Rushing this process can result in tough meat and underdeveloped flavors. Allow the stew to simmer on low heat for several hours to achieve a rich, flavorful sauce.

Third, don’t be shy with the spices. The berbere spice mix is what gives Zigni its distinctive flavor and heat. Feel free to adjust the amount of berbere to suit your taste preference.

Fourth, make sure to serve your Zigni with plenty of injera. This sourdough flatbread acts as the perfect sponge for the spicy, flavorful sauce of the Zigni.

Pairing Suggestions for Eritrean Zigni

When it comes to pairing Zigni with side dishes or drinks, the choices are as diverse as the Eritrean culinary landscape. A traditional Eritrean meal often includes a variety of vegetable and legume dishes, making these excellent pairing options for Zigni.

In terms of drinks, Tej, a traditional Ethiopian and Eritrean honey wine, is a popular choice. Its sweet, tangy flavor can balance out the heat of the Zigni. If you prefer non-alcoholic beverages, try pairing your Zigni with a glass of chilled Eritrean t’ej, a type of fermented tea.

The Cultural Significance of Zigni in Eritrea

Zigni is more than just a meal in Eritrea; it’s a dish that holds cultural and social significance. It often graces the table during special occasions, celebrations, and gatherings, serving as a symbol of hospitality and generosity.

In Eritrean culture, sharing a meal is an intimate act of community, and Zigni, with its communal serving style, exemplifies this tradition. As such, mastering the Eritrean Zigni recipe is not just about learning to cook a dish; it’s about immersing oneself in the vibrant culture and rich traditions of Eritrea.

Exploring More Eritrean Recipes

While Zigni is a quintessential Eritrean dish, the country’s culinary landscape is a rich tapestry of flavors waiting to be explored. From the spicy, tangy Alicha, a vegetable stew, to the hearty Ful, a fava bean dish, the Eritrean kitchen offers a culinary adventure for every palate.

If you’ve mastered the Eritrean Zigni recipe and are looking for more culinary challenges, why not try your hand at making injera, the staple Eritrean bread, or Shiro, a nutritious chickpea stew. Each recipe offers a glimpse into the Eritrean way of life and is a testament to the country’s rich culinary heritage.

Where to Eat Zigni in Eritrea: Food Tourism

If your culinary journey has inspired you to experience authentic Eritrean Zigni firsthand, then a trip to Eritrea should be on your bucket list. From the bustling street markets of Asmara to the quiet, rustic eateries of the countryside, Eritrea offers a wealth of dining experiences that cater to every taste and preference.

The capital city, Asmara, is particularly renowned for its vibrant food scene. Here, you can find traditional restaurants serving authentic Eritrean zigni, cooked to perfection and served with warm, freshly baked injera.

However, to truly experience the richness of Eritrean cuisine, consider venturing beyond the city limits. The small towns and villages offer a unique, authentic culinary experience, where traditional recipes are passed down through generations and meals are prepared with locally sourced ingredients.

Conclusion

Mastering the art of the Eritrean Zigni recipe is more than just a culinary achievement; it’s a journey into the heart of Eritrea, a chance to experience a culture rich in tradition, diversity, and a love for good food. Whether you’re a seasoned chef or a home cook looking for a new challenge, the Eritrean Zigni recipe offers an exciting culinary adventure. So why not roll up your sleeves, fire up the stove, and embark on this delicious journey into the heart of Eritrean cuisine?

Mastering the Art of Doro Wat: A Comprehensive Guide to Ethiopia’s Signature Dish

Fascination with Ethiopian cuisine is on the rise, and at the heart of it lies the Doro Wat – a spicy, aromatic, and soulful stew that captures the vibrant spirit of this African nation. When anyone mentions Ethiopian food, Doro Wat is undoubtedly the first dish that comes to mind. It is not just a dish; it’s an experience, a culinary journey into the heart of Ethiopia, a taste of its rich cultural heritage.

Doro Wat is a comforting, hearty stew with a deep, robust flavor profile. It’s made with chicken, slow-cooked to perfection in a blend of spices, and served with Injera, a sourdough-risen flatbread with a slightly spongy texture. The dish is a staple in Ethiopian homes and is often served during special occasions, making it a significant part of the country’s food culture.

The journey to mastering the art of Doro Wat is an exciting adventure, filled with fragrant spices, rich flavors, and traditional cooking techniques. This comprehensive guide will walk you through everything you need to know about this Ethiopian delight, from its unique attributes, ingredients, and step-by-step Doro Wat recipe from Ethiopia, to tips for mastering the recipe, what to serve it with, and common mistakes to avoid.

What Makes Doro Wat Unique

Doro Wat stands out because of its unique blend of ingredients and the careful, time-consuming process that goes into preparing it. Its uniqueness lies in the harmonious balance of flavors – the heat from the Berbere spice, the earthy undertones of the Niter Kibbeh (Ethiopian spiced butter), and the tanginess of the Injera bread.

Another aspect that sets Doro Wat apart is its cultural significance. It’s a dish that brings families together, a centerpiece during festivals, religious holidays, and family gatherings. It’s a symbol of hospitality and a way of celebrating the rich Ethiopian culture.

The process of making Doro Wat is also unique. It’s slow-cooked for several hours, allowing the flavors to meld together and the chicken to become incredibly tender. This slow-cooking process is a testament to the Ethiopian way of life, emphasizing patience, attention to detail, and respect for the ingredients and the cooking process.

Ingredients and Quantities in a Doro Wat Recipe

The magic of a Doro Wat recipe Ethiopia lies in its ingredients. Each one plays a pivotal role in creating the dish’s distinctive flavor profile.

  1. Chicken: The primary ingredient in Doro Wat. You’ll need about 2-3 pounds of chicken, preferably bone-in for added flavor.
  2. Berbere Spice: This is the heart and soul of Doro Wat. This spice blend includes chili peppers, fenugreek, paprika, ginger, and several other spices. You’ll need about 1/3 cup for this dish.
  3. Niter Kibbeh: This is a spiced clarified butter that’s used in many Ethiopian dishes. It adds a rich, nutty flavor to the stew. About a 1/2 cup should suffice.
  4. Onions: You’ll need about 4 large onions, finely chopped. They form the base of the stew.
  5. Garlic and Ginger: These add warmth and depth to the stew. You’ll need about 4 cloves of garlic and a 2-inch piece of fresh ginger, both finely minced.
  6. Chicken Stock: This helps to tenderize the chicken and adds additional flavor to the stew. You’ll need about 2 cups.
  7. Eggs: Hard-boiled eggs are a traditional addition to Doro Wat. You’ll need about 4-6 eggs, depending on your preference.
  8. Lemon: A squeeze of fresh lemon juice adds a touch of acidity to balance the heat of the spices. One lemon should be enough.

Step-by-Step Doro Wat Recipe from Ethiopia

Now, let’s dive into the step-by-step process of making Doro Wat. This Doro Wat recipe Ethiopia will guide you through the process, helping you create a dish that’s authentic and full of flavor.

  1. Prepare the Ingredients: Start by cleaning and cutting the chicken into pieces, finely chopping the onions, mincing the garlic and ginger, hard-boiling the eggs, and juicing the lemon.
  2. Cook the Onions: In a large pot, melt the Niter Kibbeh over medium heat. Add the onions and cook until they’re soft and translucent.
  3. Add the Spices: Add the Berbere spice, garlic, and ginger to the pot. Cook for a few minutes until the spices are fragrant.
  4. Add the Chicken: Add the chicken pieces to the pot, making sure they’re well-coated in the spice mixture. Cook until the chicken is browned on all sides.
  5. Add the Stock and Simmer: Add the chicken stock to the pot, reduce the heat to low, cover the pot, and let it simmer for about 2-3 hours. Check the pot occasionally and add more stock or water if needed.
  6. Add the Eggs: About 30 minutes before the stew is done, add the hard-boiled eggs. They’ll absorb some of the flavors from the stew.
  7. Finish with Lemon Juice: Just before serving, add a squeeze of fresh lemon juice to the stew. This will balance out the flavors and add a touch of freshness to the dish.

Tips for Mastering the Doro Wat Recipe

Mastering the Doro Wat recipe Ethiopia may seem challenging, but with a few tips and tricks, you can create a dish that’s flavorful, authentic, and true to its Ethiopian roots.

  1. Take Your Time: Doro Wat is not a dish that can be rushed. The slow-cooking process is crucial for developing the flavors and achieving the desired consistency. Be patient and let the stew simmer slowly.
  2. Use Quality Ingredients: The quality of your ingredients can make or break your Doro Wat. Use fresh, high-quality ingredients whenever possible. This is especially important for the Berbere spice and Niter Kibbeh.
  3. Adjust the Heat: The heat level in Doro Wat can be adjusted according to your preference. If you prefer a milder stew, reduce the amount of Berbere spice.

Pairing Doro Wat: What to Serve with this Ethiopian Delight

Doro Wat is traditionally served with Injera, a sourdough flatbread that’s a staple in Ethiopian cuisine. The tangy flavor of the Injera complements the spicy, robust flavors of the Doro Wat, creating a well-balanced meal.

In addition to Injera, Doro Wat can also be served with a side of fresh vegetables or a simple salad. The freshness of the vegetables will provide a nice contrast to the rich, hearty stew.

Making Doro Wat: Common Mistakes to Avoid

As with any new recipe, there are a few common mistakes to avoid when making Doro Wat.

  1. Rushing the Cooking Process: Doro Wat needs time to simmer and develop its flavors. Don’t rush the cooking process or your stew might end up lacking depth and complexity.
  2. Using the Wrong Spices: Doro Wat gets its distinctive flavor from the Berbere spice blend. Using a different spice blend or omitting it altogether will result in a dish that’s not authentic.
  3. Skipping the Eggs: The hard-boiled eggs are a crucial part of Doro Wat. They absorb the flavors of the stew and add a nice texture contrast to the dish.

Variations of Doro Wat Recipe Across Ethiopia

Doro Wat recipes can vary from region to region across Ethiopia. Some variations might include additional ingredients like tomatoes, bell peppers, or other types of meat. Some regions might use more or less Berbere spice, depending on the local palate.

Regardless of the variation, the essence of Doro Wat remains the same – it’s a hearty, flavorful stew that’s a true reflection of Ethiopian cuisine.

Where to Taste the Best Doro Wat in Ethiopia

If you’re fortunate enough to travel to Ethiopia, be sure to try Doro Wat at a local restaurant or home. Some renowned places to try this dish include the capital city Addis Ababa, where the dish is often served with a side of traditional music and dance.

Conclusion: Embrace Ethiopia’s Culinary Culture with Doro Wat

Mastering the art of Doro Wat is more than just learning a new recipe. It’s embracing a piece of Ethiopia’s vibrant culinary culture, a chance to experience the country’s rich history and tradition through its food.

Whether you’re an experienced home cook or a newbie in the kitchen, creating a Doro Wat recipe Ethiopia is a culinary adventure worth undertaking. It’s a journey filled with aromatic spices, rich flavors, and traditional cooking techniques that will leave you with a deeper appreciation for Ethiopian cuisine and a delicious dish to share with your loved ones.

Discover the Authentic Akeke Recipe from Benin

Akeke is a traditional delicacy from Benin that has been enjoyed for generations. This unique dish is a testament to the rich culinary heritage of the country. Akeke is a type of cake made from fermented cornmeal, which gives it a distinctive flavor and texture. It is often served during special occasions and celebrations, and its preparation involves a combination of traditional techniques and local ingredients. The process of making Akeke is an art form in itself, and it requires patience and skill to achieve the perfect balance of flavors. If you’re a food enthusiast looking to explore new culinary horizons, Akeke is definitely worth trying.

The history and cultural significance of Akeke

Akeke has a long history that dates back centuries in Benin. It is believed to have originated from the Fon people, an ethnic group in Benin known for their rich cultural traditions. Akeke is not just a delicious food, but also holds great cultural significance. It is often prepared during important celebrations such as weddings, festivals, and religious ceremonies. The process of making Akeke is often a communal activity, bringing families and communities together. It is a way of preserving cultural identity and passing down traditions from one generation to the next. Akeke is a symbol of unity, celebration, and the vibrant culinary heritage of Benin.

Ingredients and quantity required for an authentic Akeke recipe

To make an authentic Akeke, you will need the following ingredients:

  • 2 cups of cornmeal
  • 1 cup of water
  • 1 teaspoon of salt
  • 1 tablespoon of sugar
  • 1 teaspoon of baking powder
  • 1 cup of grated coconut
  • 1 cup of palm oil

These quantities are for a standard Akeke recipe, but they can be adjusted according to personal preferences. The cornmeal is the main ingredient, and it is important to use a high-quality cornmeal for the best results. The grated coconut adds a tropical touch to the Akeke, while the palm oil gives it a rich and distinctive flavor. The salt and sugar balance the flavors and enhance the taste of the dish. The baking powder helps the Akeke rise and gives it a light and fluffy texture.

Step-by-step instructions to prepare Akeke

  1. In a large bowl, mix the cornmeal, salt, sugar, and baking powder together.
  2. Gradually add water to the mixture and knead it into a smooth dough.
  3. Cover the dough with a clean cloth and let it ferment for at least 6 hours or overnight. This fermentation process is what gives Akeke its unique flavor.
  4. After the fermentation period, add the grated coconut to the dough and mix well.
  5. Heat the palm oil in a frying pan over medium heat.
  6. Take a small amount of the dough and shape it into a round ball. Flatten it slightly to form a pancake-like shape.
  7. Carefully place the dough in the hot oil and fry until golden brown on both sides.
  8. Repeat the process with the remaining dough, adding more oil as needed.
  9. Once cooked, remove the Akeke from the pan and place it on a paper towel to absorb any excess oil.
  10. Serve the Akeke warm with your favorite accompaniments.

Tips and tricks for perfecting your Akeke

  • Use fresh ingredients for the best flavor. The quality of the cornmeal, coconut, and palm oil will greatly impact the taste of your Akeke.
  • Allow enough time for the dough to ferment. This step is crucial for developing the unique flavors of Akeke.
  • Adjust the amount of salt and sugar according to your taste preferences. Some people prefer a sweeter Akeke, while others prefer it to be more savory.
  • Keep an eye on the frying process to ensure the Akeke doesn’t burn. Adjust the heat as needed to achieve a golden-brown color.
  • Experiment with different accompaniments to enhance the flavors of Akeke. It pairs well with savory dishes like stews or can be enjoyed on its own with a cup of tea.

Variations and adaptations of the Akeke recipe

While the authentic Akeke recipe remains a favorite among Beninese households, there are also variations and adaptations of this traditional dish. Some people add additional ingredients such as chopped vegetables, spices, or even protein like fish or meat to create a unique twist on the classic recipe. These variations allow for creativity in the kitchen and cater to individual tastes and preferences. However, it’s important to remember that the essence of Akeke lies in its simplicity and the use of traditional ingredients.

Serving suggestions and accompaniments for Akeke

Akeke can be enjoyed in various ways, depending on personal preferences. It can be served as a side dish with a main course, or as a standalone snack. Akeke pairs well with a variety of accompaniments, such as:

  • Grilled or roasted meats
  • Vegetable stews
  • Sautéed greens
  • Fresh salads
  • Spicy sauces or dips

The versatility of Akeke allows it to be incorporated into different meals and enjoyed in various settings. Its unique flavor and texture make it a delightful addition to any dining experience.

Where to find Akeke in Benin and beyond

If you’re planning to visit Benin, you’ll have ample opportunities to taste Akeke in local restaurants, street food stalls, and even at traditional ceremonies and festivals. Akeke is deeply rooted in Beninese cuisine, and it is widely available throughout the country. Beyond Benin, Akeke can be found in other West African countries, where it may have slight variations in preparation and presentation. It’s a dish that truly represents the culinary diversity of the region.

Health benefits of Akeke and its nutritional value

Akeke not only delights the taste buds but also offers some health benefits. The main ingredient, cornmeal, is a good source of carbohydrates, providing energy for the body. It also contains dietary fiber, which aids in digestion and promotes a healthy digestive system. The addition of coconut adds essential nutrients such as vitamins, minerals, and healthy fats. However, it’s worth noting that Akeke should be enjoyed in moderation as part of a balanced diet.

Conclusion – Embrace the flavors of Benin with Akeke

Akeke is more than just a delicious cake; it is a representation of Benin’s vibrant culinary heritage. Its rich history, cultural significance, and unique flavors make it a culinary delight worth exploring. Whether you’re planning a trip to Benin or looking to expand your culinary horizons, Akeke is a dish that should not be missed. Try your hand at preparing an authentic Akeke recipe, and savor the flavors that have been enjoyed by generations. Embrace the flavors of Benin and let Akeke transport you to a land of tradition and gastronomic delight.

The Ultimate Guide to Making a Delicious Hangi Meal in New Zealand

Are you ready to embark on a culinary adventure through New Zealand? One of the must-try traditional dishes in this beautiful country is the Hangi. A Hangi is a Maori style of cooking that involves steaming food underground, resulting in a delicious and unique flavor. In this comprehensive guide, we will take you through the step-by-step process of preparing and cooking a Hangi, providing you with all the information you need to recreate this mouthwatering meal in your own home.

Table of Contents

  1. Introduction
  2. History and Significance of the Hangi
  3. Building the Fire
  4. Food Preparation
  5. Covering and Cooking the Hangi
  6. Uncovering the Hangi
  7. Tips for a Successful Hangi
  8. Conclusion

1. Introduction

The Hangi is an iconic traditional cooking method of the Maori people, the indigenous population of New Zealand. It involves cooking food in an earth oven, which is created by heating rocks in a fire and then burying them with the food in a pit. The food cooks slowly through the release of steam, resulting in tender meat and perfectly cooked vegetables with a distinct smoky flavor.

2. History and Significance of the Hangi

The Hangi has a deep-rooted history and cultural significance in Maori traditions. It has been practiced for centuries as a way to bring communities together and celebrate special occasions such as weddings, births, and funerals. The process of preparing and cooking a Hangi is often a communal effort, with everyone pitching in to gather the necessary ingredients, prepare the food, and tend to the fire.

3. Preparing for the Hangi

a. Gathering the Right Rocks and Wood

To ensure a successful Hangi, it is crucial to gather the right type of rocks and wood. The rocks should be volcanic, as they can withstand high temperatures without cracking or exploding. Non-volcanic stones can be dangerous and may compromise the cooking process. Additionally, select hardwoods that burn slowly and generate plenty of heat. Macrocarpa is an excellent choice as it is readily available, produces intense heat, and burns for an extended period.

b. Selecting the Perfect Cooking Spot

When choosing a spot for your Hangi, consider the size of your pit. It should be deep enough to accommodate the hot stones, wide enough for the food baskets, and slightly flared out to the sides. This shape allows for easier food placement and retrieval. Remember to protect the Hangi from wind, as it can cool the stones and affect the cooking process.

c. Soaking Sacks and Cloths

Before starting the Hangi, soak nonflammable sacks, mutton cloths, and a sheet in water. These damp materials will create steam when combined with the hot stones, ensuring the food cooks properly. Make sure to have enough sacks and cloths to cover all the food and prevent any dirt from entering.

d. Protecting the Hangi from the Elements

In case of rain, it is essential to have tarpaulins and corrugated iron on hand to protect the Hangi. Wind is more detrimental to the cooking process than rain, as it can cool the stones. Proper preparation, including covering the Hangi with these materials, will help ensure a successful cooking experience.

4. Building the Fire

a. Choosing the Ideal Location

Decide whether you want to burn the fire over the hole or build it beside the Hangi pit. Burning the fire over the hole requires thorough removal of ash to prevent a smoky taste in the food. Building the fire beside the pit allows for easier relocation of the hot stones into a clean hole. Whichever method you choose, make sure to have extra workers on hand to rotate and maintain the fire’s intensity.

b. Stacking the Wood and Volcanic Stones

There is no specific way to stack the wood, as long as there is enough space for air circulation and the volcanic stones are strategically placed throughout the pile. It is advisable to cover the wood if rain is expected before the Hangi. The fire should be lit approximately 3-5 hours before you plan to start cooking, allowing ample time for the stones to heat up.

c. Lighting the Fire

Once the fire is ablaze, attend to it by placing any fallen stones back into the fire and ensuring a consistent heat source. Be cautious when relocating the hot stones into the Hangi pit, as this process requires speed and protection from burns. Swiftly transfer the stones while maintaining their heat.

5. Food Preparation

a. Traditional Hangi Ingredients

The beauty of the Hangi is its versatility in accommodating various ingredients. Traditionally, chicken, beef, pork, potatoes, carrots, pumpkins, and kumara (sweet potatoes) are commonly used. However, feel free to experiment with other meats and vegetables based on your preferences and availability.

b. Seasoning and Wrapping the Meat

When preparing the meat, season it with your preferred spices, such as garlic, rosemary, or sage. Traditionally, the meat was wrapped in leaves of edible plants, but today, cabbage or banana leaves, or tinfoil, can be used as substitutes. Wrapping the meat helps retain moisture and infuse flavor during the cooking process.

c. Layering the Vegetables

After peeling and cutting the vegetables into suitable sizes, layer them in a mutton cloth and soak them in a pot. This prevents the vegetables from becoming too mushy during cooking. When layering the food in the Hangi baskets, place the meat closer to the heated stones and the vegetables on the upper layers.

6. Covering and Cooking the Hangi

a. Creating Steam with Wet Sacks

Once the stones are white hot and emitting substantial heat, it is time to begin the cooking process. Gently slap the hot rocks with wet sacks to create steam. The steam, combined with the water in the wet sacks, will cook the food. This step is crucial, so ensure the sacks are adequately wet and distribute the steam evenly.

b. Layering the Food and Covering with Sheets

Cover the food with a wet sheet of material, ensuring it touches the sides of the Hangi pit without touching the rocks. Layer the wet sacks over the food, strategically placing each sack to avoid dirt from falling onto the food. Start with the last sack you will remove, placing it on top, and continue overlapping the sacks until all the food is covered. The sacks at the base and sides of the hole should be the last to be placed.

c. Securing and Insulating the Hangi

When covering the sacks with dirt, start from the edges and gradually work your way to the top to prevent dirt from falling onto the stones or food. Pat down the dirt gently to create a smooth surface. If any steam escapes during the cooking process, add more dirt to the areas releasing steam. Repeat this process as needed throughout the next 2-3 hours.

7. Uncovering the Hangi

a. Checking for Doneness

After approximately 3 hours, it is time to uncover the Hangi. Carefully remove the dirt, ensuring no dirt falls onto the food. Begin peeling back the sacks, starting from the outer layers and working your way to the initial sack. The sacks may be hot, so use gloves or towels to handle them. Steam should rise from the Hangi, indicating that the food is cooked.

b. Safely Removing the Coverings

Once you have removed the sheet of material, have two people per basket ready to remove the food and transfer it to a work station for carving and serving. Take caution when handling the hot baskets and ensure the food remains intact during the transfer.

c. Serving and Enjoying the Hangi

The Hangi is best enjoyed when served immediately. Arrange the meat and vegetables on plates, and savor the unique flavors and tender textures. Share the Hangi with friends and family, appreciating the cultural significance and the communal spirit it embodies.

8. Tips for a Successful Hangi

a. Seeking Expert Advice for Larger Hangis

If you are planning a larger Hangi, it is advisable to seek advice from experienced individuals to ensure its success. Cooking for a large number of people can be challenging, and guidance from those familiar with the process will help you avoid potential pitfalls.

b. Exploring Variations and Alternative Ingredients

While traditional Hangis involve specific ingredients, feel free to explore variations and experiment with alternative meats and vegetables. Chicken, seafood, lamb, or even vegetarian options can be incorporated into the Hangi, providing a new twist on this age-old cooking method.

9. Conclusion

The Hangi is not just a meal; it is an experience that brings people together and celebrates the rich cultural heritage of New Zealand. By following the steps outlined in this guide, you can recreate the flavors and traditions of the Maori people in your own kitchen. Gather your loved ones, embark on this culinary adventure, and savor the delicious and unforgettable taste of the Hangi.

Nyama Choma: A traditional recipe from Tanzania

The Heritage of Nyama Choma

Nyama Choma, which translates to “grilled meat” in Swahili, is not just a dish but an experience deeply entrenched in East African culture, especially in Kenya and Tanzania. Rooted in age-old traditions, Nyama Choma is more than food; it’s an embodiment of community, fellowship, celebration, and the love for meat!

Tracing the Origins of Nyama Choma

The Maasai people of East Africa have been practicing livestock farming for centuries. Their diet predominantly consisted of milk, meat, and blood from cattle. With such deep ties to meat, the Maasai played a significant role in popularizing grilled meat in the region. As urbanization occurred, and people from different parts of the region met and exchanged cultural practices, Nyama Choma evolved into a beloved communal ritual. Today, Nyama Choma joints, known locally as “Choma zones,” are popular spots in East Africa, especially in urban centers like Nairobi and Dar es Salaam. They are places where people gather to chat, celebrate, and enjoy meat grilled to perfection.

Essential Ingredients for Nyama Choma

  1. 2 kg of goat or beef meat (traditionally, goat is used), cut into chunks
  2. 2-3 tablespoons of salt
  3. Freshly squeezed lemon juice (optional)
  4. Chili, garlic, and ginger (optional for those who prefer a bit of spice)

Note: The beauty of Nyama Choma is its simplicity. The focus is on the meat’s natural flavors. However, some variations exist where people marinate the meat.

Step-by-Step Cooking Instructions

  1. Preparation: If you’re using any additional ingredients for marination, mix them to make a paste. Rub this paste onto the meat chunks and let it marinate for a few hours. This step, however, is optional. Traditional Nyama Choma is typically not marinated beyond the use of salt.
  2. Grilling: Preheat your grill. Traditional Nyama Choma is grilled over open flames using wood or charcoal, which gives it a smoky flavor.
  3. Seasoning: Once the grill is ready, sprinkle the meat with salt and place it on the grill. Remember, the meat should be near but not directly over the flames to achieve the perfect grill without burning.
  4. Turning: As the meat grills, turn it occasionally to ensure it’s evenly cooked. Use the lemon juice to sprinkle on the meat while turning. It adds flavor and tenderizes the meat.
  5. Serving: Nyama Choma is done when it’s browned to your liking. It’s traditionally served with a side of kachumbari (a type of East African salsa) and ugali (a dense side dish made from maize flour and water). Tear off a piece of meat, dip it in salt, enjoy with a bite of ugali and kachumbari, and you have the authentic Nyama Choma experience!

Embracing the Full Nyama Choma Experience

To get the full Nyama Choma experience, it’s essential to enjoy it in the company of friends or family. The act of sharing meat straight from the grill, discussing everything from daily life to deep philosophical topics, is what truly defines Nyama Choma.

From the Tropical Paradise: Authentic Dakhin Recipes from São Tomé and Príncipe

From the Tropical Paradise: Authentic Dakhin Recipes from São Tomé and Príncipe

São Tomé and Príncipe is a tropical paradise located off the coast of Central Africa. This small island nation is known for its stunning beaches, lush rainforests, and vibrant culture. One of the highlights of the São Tomé and Príncipe experience is the local cuisine, which offers a unique blend of African, Portuguese, and Creole flavors. In this article, we will explore the Dakhin recipe, a traditional dish from São Tomé and Príncipe that is sure to tantalize your taste buds.

Introduction to São Tomé and Príncipe cuisine

São Tomé and Príncipe cuisine is a reflection of the country’s rich history and diverse cultural influences. As an island nation, seafood plays a significant role in the local dishes. Fish, shrimp, and lobster are commonly used ingredients in many São Toméan recipes. Additionally, the Portuguese colonization of the islands has left a lasting impact on the cuisine, with flavors and techniques borrowed from Portuguese cooking.

What is Dakhin?

Dakhin is a traditional dish from São Tomé and Príncipe that showcases the fusion of African and Portuguese flavors. It is a hearty stew made with a variety of ingredients, including fish, vegetables, and spices. The dish is known for its rich and complex flavors, which are achieved through the careful combination of different ingredients and cooking techniques.

History and cultural significance of Dakhin in São Tomé and Príncipe

Dakhin has a long history in São Tomé and Príncipe and is deeply rooted in the local culture. It is believed to have originated from the African slaves brought to the island during the colonial era. These slaves adapted their traditional recipes to incorporate local ingredients, resulting in the creation of Dakhin. Over time, the dish has become a staple in São Toméan cuisine and is often served at special occasions and family gatherings.

Authentic Dakhin recipe – ingredients quantity and preparation

To prepare an authentic Dakhin, you will need the following ingredients:

  • 2 pounds of fresh fish fillets (such as grouper or snapper)
  • 1 onion, chopped
  • 2 cloves of garlic, minced
  • 1 red bell pepper, diced
  • 2 tomatoes, chopped
  • 1 cup of coconut milk
  • 1 tablespoon of palm oil
  • 1 tablespoon of tomato paste
  • 1 teaspoon of paprika
  • 1 teaspoon of ground ginger
  • 1 teaspoon of ground coriander
  • Salt and pepper to taste

Before starting the cooking process, make sure to clean and debone the fish fillets. Cut them into bite-sized pieces and set them aside. Next, heat the palm oil in a large pot over medium heat. Add the onions, garlic, and red bell pepper, and sauté until they are soft and fragrant.

Step-by-step instructions for cooking Dakhin

  1. In the same pot, add the chopped tomatoes, tomato paste, paprika, ground ginger, and ground coriander. Stir well to combine the ingredients and cook for a few minutes until the tomatoes start to soften.
  2. Slowly pour in the coconut milk and stir until it is well incorporated with the other ingredients in the pot. Bring the mixture to a simmer and let it cook for about 10 minutes.
  3. Gently add the fish pieces to the pot, making sure they are submerged in the sauce. Season with salt and pepper to taste. Cover the pot and let the Dakhin simmer for another 15-20 minutes, or until the fish is cooked through and tender.
  4. Once the Dakhin is cooked, remove it from the heat and let it sit for a few minutes to allow the flavors to meld together. Serve the Dakhin hot with steamed rice or crusty bread.

Tips for achieving the perfect Dakhin flavor

To achieve the perfect Dakhin flavor, here are some tips to keep in mind:

  1. Use fresh ingredients: Fresh fish and vegetables will enhance the taste of the Dakhin. Avoid using frozen fish or canned vegetables for the best results.
  2. Adjust the spices: Feel free to adjust the spices according to your personal preference. If you like it spicier, add more paprika or chili flakes. If you prefer a milder flavor, reduce the amount of ginger and coriander.
  3. Let it simmer: The longer you let the Dakhin simmer, the more flavorful it will become. Allow the ingredients to cook together slowly to develop a rich and complex taste.

Variations and adaptations of Dakhin recipe

While the authentic Dakhin recipe is a delicious and satisfying dish on its own, there are several variations and adaptations you can try to add your own personal touch. Here are a few ideas:

  1. Seafood Dakhin: Instead of using only fish, you can combine different types of seafood such as shrimp, squid, or crab to create a seafood medley in your Dakhin.
  2. Vegetarian Dakhin: For those who prefer a vegetarian option, you can substitute the fish with tofu or a variety of vegetables such as eggplant, okra, and sweet potatoes.
  3. Spicy Dakhin: If you enjoy spicy food, you can add extra chili peppers or hot sauce to give your Dakhin a fiery kick.

Serving suggestions and accompaniments for Dakhin

Dakhin is a versatile dish that can be enjoyed in various ways. Here are some serving suggestions and accompaniments to enhance your Dakhin experience:

  1. Steamed rice: Serve the Dakhin over a bed of fluffy white rice for a hearty and satisfying meal.
  2. Crusty bread: Dip a slice of crusty bread into the flavorful sauce of the Dakhin for a delicious combination of textures and flavors.
  3. Fresh salad: Pair the Dakhin with a refreshing salad made with crisp lettuce, tomatoes, cucumbers, and a tangy vinaigrette dressing.

Where to find Dakhin ingredients outside São Tomé and Príncipe

If you are not able to find all the necessary ingredients for Dakhin in your local grocery store, there are several options to consider. Specialty African or international food stores may carry some of the key ingredients such as palm oil, ground ginger, and ground coriander. Alternatively, you can also explore online retailers that offer a wide range of international ingredients and have them delivered to your doorstep.

Conclusion and final thoughts on Dakhin from São Tomé and Príncipe

Dakhin is a truly authentic dish from São Tomé and Príncipe that captures the essence of the island nation’s cuisine. With its unique blend of flavors and cultural significance, it is a must-try for any food enthusiast. Whether you decide to follow the traditional recipe or add your own twist, Dakhin is sure to transport your taste buds to the tropical paradise of São Tomé and Príncipe. So, gather your ingredients, put on some island music, and embark on a culinary journey to discover the flavors of this vibrant and diverse country.

CTA:

If you’re craving a taste of São Tomé and Príncipe, why not try making Dakhin at home? Gather the ingredients, follow the step-by-step instructions, and let the flavors of this tropical paradise transport you to the beautiful islands of São Tomé and Príncipe.

Mutton Yassa Recipe From Mali: A Detailed Guide for Food Lovers

Introduction to Mutton Yassa Recipe Mali

Mutton Yassa Recipe Mali, a quintessential West African dish, has gained immense popularity across the globe for its exquisite taste and unique flavour profile. This dish, deeply rooted in Malian cuisine, boasts a fascinating blend of ingredients that perfectly balance each other. The amalgamation of tender mutton, tangy lemon, and spicy chili, all simmered together, results in a gastronomic experience that is nothing short of spectacular.

The appeal of Mutton Yassa Recipe Mali extends beyond its taste. The dish represents a culture, a tradition, and a way of life. It is more than just a meal; it’s a celebration of Malian history and cuisine. For food lovers and culinary enthusiasts, this dish offers a delightful adventure into the heart of West African cuisine.

Understanding and mastering the Mutton Yassa Recipe Mali requires not just knowledge of the ingredients and steps but also an appreciation for its history, its cultural significance, and the nuances of Malian cuisine. This guide aims to provide a comprehensive overview of everything you need to know about this iconic dish.

The Origin and History of Mutton Yassa Recipe Mali

Mutton Yassa Recipe Mali has a rich and intriguing history that is intertwined with the cultural evolution of the Malian people. The dish finds its roots in the coastal regions of West Africa, where it was traditionally prepared with chicken. However, with the movement of people and the exchange of cultures, different variations of the dish started to emerge, one of which is the Mutton Yassa Recipe Mali.

Historically, the dish was a favourite among the Mandinka people, one of the largest ethnic groups in Mali. They used local ingredients and traditional cooking methods to prepare this delicious mutton dish. Over time, the Mutton Yassa Recipe Mali has evolved, with each generation adding their unique touch to the recipe, while still preserving the essence of the original dish.

The Mutton Yassa Recipe Mali has not only survived the test of time but has thrived, becoming a symbol of Malian cuisine. Its popularity has spread beyond the borders of Mali, introducing food lovers worldwide to the delightful flavors of West African cuisine.

Ingredients And Quantity Required for Mutton Yassa Recipe Mali

The magic of the Mutton Yassa Recipe Mali lies in the combination of simple, readily available ingredients cooked to perfection. The primary ingredient, as the name suggests, is mutton. However, the true essence of the dish comes from the unique combination of spices and condiments that give it its distinctive taste.

For a serving of four, you will need:

  • 1 kg mutton, chopped into pieces
  • 4 onions, thinly sliced
  • 4 cloves of garlic, minced
  • 2 green chilies, finely chopped
  • Juice of 4 lemons
  • 1 tablespoon of Dijon mustard
  • Salt to taste
  • 1 tablespoon of vegetable oil
  • 2 tablespoons of vinegar
  • 1 chicken stock cube
  • 1 cup of water

These ingredients, when combined and cooked together, result in a dish that is tangy, spicy, and incredibly satisfying.

Step-by-step Guide to Preparing Mutton Yassa Recipe Mali

The preparation of the Mutton Yassa Recipe Mali involves a blend of traditional cooking techniques and modern culinary practices. The process begins with marinating the mutton in a mixture of lemon juice, onions, garlic, and mustard. This step is crucial as it allows the mutton to absorb the tangy flavours, ensuring a succulent and tasty outcome. The mutton is then left to marinate for at least two hours, or preferably overnight.

Once the mutton is thoroughly marinated, it is time to cook the dish. Heat the oil in a large pan, and add the marinated mutton pieces. Cook the mutton on medium heat until it turns brown. Then, add the leftover marinade, chicken stock cube, water, and vinegar to the pan. Let the mixture simmer until the mutton is tender and the sauce has thickened.

The Mutton Yassa Recipe Mali is traditionally served with rice, making it a complete and balanced meal.

Expert Tips and Tricks for Mastering Mutton Yassa Recipe Mali

While the Mutton Yassa Recipe Mali may seem straightforward, there are a few expert tips and tricks that can help you master this dish. Firstly, it’s essential to choose good quality mutton for this recipe. The quality of the meat significantly impacts the final dish’s taste and texture.

Secondly, don’t rush the marinating process. The longer the mutton marinates, the more flavour it will absorb. If possible, leave the mutton to marinate overnight in the refrigerator. This will give you a more flavorful and tender mutton.

Also, remember to cook the mutton on medium heat. High heat can cause the mutton to become tough and lose its juiciness. Lastly, be patient and allow the mutton to simmer until it is tender. This step might take some time, but the result is well worth the wait.

Pairing Suggestions for Mutton Yassa Recipe Mali

The Mutton Yassa Recipe Mali is a versatile dish that pairs well with various side dishes and beverages. Traditionally, it is served with rice, which complements the tangy and spicy flavors of the mutton yassa. Apart from rice, you can also pair the dish with bread, couscous, or roasted vegetables for a more varied meal.

When it comes to beverages, a glass of red wine or a cold beer goes well with the Mutton Yassa Recipe Mali. The robust flavors of the dish can stand up to the boldness of a full-bodied red wine or the refreshing taste of a cold beer.

Cultural Significance of Mutton Yassa Recipe Mali

The Mutton Yassa Recipe Mali is more than just a dish; it’s a cultural icon. It represents the rich culinary heritage of Mali and showcases the traditional cooking techniques and ingredients used in Malian cuisine. The dish is often prepared for special occasions and gatherings, symbolizing unity, hospitality, and the sharing of good food.

In Mali, preparing and sharing the Mutton Yassa Recipe Mali is a communal activity, bringing family and friends together. The dish is usually cooked in large quantities and shared among the community, fostering a sense of togetherness and camaraderie.

Health Benefits of Mutton Yassa Recipe Mali

The Mutton Yassa Recipe Mali is not only delicious but also nutritious. Mutton is a rich source of protein, essential for muscle growth and repair. It also contains a good amount of iron, which helps in the production of red blood cells.

Onions, a key ingredient in the recipe, are rich in antioxidants and have anti-inflammatory properties. They also provide a good amount of vitamin C, which boosts the immune system. The lemon juice used in the dish is a great source of vitamin C and helps in the absorption of iron in the body.

Despite its rich flavor, the Mutton Yassa Recipe Mali is relatively low in calories, making it a suitable dish for those watching their calorie intake.

Common Mistakes to Avoid When Cooking Mutton Yassa Recipe Mali

While the Mutton Yassa Recipe Mali might seem simple to prepare, there are a few common mistakes that can affect the final outcome of the dish. One such mistake is not marinating the mutton long enough. The marinating process is crucial in this recipe as it allows the mutton to absorb the flavors, resulting in a more flavorful dish.

Another common mistake is cooking the mutton at high heat. This can cause the mutton to become tough and dry. Instead, cook the mutton at medium heat and allow it to simmer until it is tender.

Lastly, avoid overloading the dish with too many spices. The beauty of the Mutton Yassa Recipe Mali lies in its simplicity. The dish should be a perfect balance of tangy, spicy, and savory flavors. Overdoing it with the spices can overshadow the dish’s natural flavors.

Conclusion

Mastering the Mutton Yassa Recipe Mali is a journey into the heart of West African cuisine. This dish, with its rich history, cultural significance, and delightful flavors, offers a unique culinary experience. By understanding the ingredients, following the steps, and avoiding common mistakes, you can prepare a delicious Mutton Yassa Recipe Mali at home. So, why wait? Embark on this culinary adventure and discover the flavors of Mali.

Ivory Coast Aloco Recipe: Spiced Plantain Delight

Introduction to Aloco: A traditional dish from Ivory Coast

Aloco, a traditional dish from Ivory Coast, is a delightful blend of plantains and spices that is sure to tantalize your taste buds. This mouthwatering recipe has deep roots in the country’s rich culinary history and holds great cultural significance. The combination of the sweet and savory flavors in Aloco makes it a favorite among locals and tourists alike. In this article, we will explore the history and cultural significance of Aloco, the ingredients and quantities needed for an authentic recipe, a step-by-step guide to preparing Aloco, variations of the dish, serving suggestions, health benefits of its main ingredients, where to find Aloco in Ivory Coast and beyond, and some tips and tricks for perfecting your own Aloco recipe.

The history and cultural significance of Aloco in Ivory Coast

Aloco has a long history in Ivory Coast and is deeply rooted in the country’s culinary traditions. It is believed to have originated in the southern regions of the country, where plantains are abundant. The dish has been passed down through generations, with each family adding their own unique twist to the recipe. Aloco is often served during special occasions, such as weddings and festivals, and is a symbol of community and togetherness.

The Nature of the Ivory Coast

The cultural significance of Aloco extends beyond its role as a delicious dish. It is a representation of the country’s rich cultural heritage and the importance of food in Ivorian society. The preparation of Aloco often involves the entire family, with each member contributing to different steps of the cooking process. This communal approach to cooking and sharing meals reflects the strong sense of community and generosity that is deeply ingrained in Ivorian culture.

Ingredients and quantities for an authentic Aloco recipe

To prepare an authentic Aloco recipe, you will need the following ingredients:

  • 4 ripe plantains
  • 1 cup of vegetable oil
  • 1 onion, finely chopped
  • 2 cloves of garlic, minced
  • 1 teaspoon of ginger, grated
  • 1 teaspoon of paprika
  • Salt and pepper to taste

These quantities are for a basic Aloco recipe, but feel free to adjust them based on your personal preferences. The plantains should be ripe but firm, as they will provide the perfect balance of sweetness and texture to the dish. The onion, garlic, and ginger add a depth of flavor, while the paprika, salt, and pepper enhance the overall taste profile.

Step-by-step guide to preparing Aloco

  1. Start by peeling the plantains and cutting them into thick slices.
  2. Heat the vegetable oil in a deep frying pan or pot over medium heat.
  3. Once the oil is hot, carefully add the plantain slices and fry them until they turn golden brown on both sides. This should take about 5 minutes.
  4. Remove the plantains from the oil and place them on a paper towel-lined plate to drain excess oil.
  5. In a separate pan, heat a tablespoon of vegetable oil and sauté the chopped onion, minced garlic, and grated ginger until they become fragrant and slightly caramelized.
  6. Add the fried plantains to the pan and sprinkle them with paprika, salt, and pepper. Gently toss everything together to ensure the flavors are evenly distributed.
  7. Cook for an additional 2-3 minutes, until the plantains are well coated with the spice mixture.
  8. Remove from heat and serve hot.

Variations of Aloco: Adding your own twist to the recipe

While the authentic Aloco recipe is delicious on its own, you can also add your own twist to the dish to create unique flavor combinations. Here are a few variations to consider:

  1. Spicy Aloco: If you enjoy a bit of heat, add some chopped chili peppers or a dash of cayenne pepper to the spice mixture.
  2. Sweet and Savory Aloco: Sprinkle the fried plantains with a pinch of cinnamon and drizzle them with honey or maple syrup for a sweet and savory twist.
  3. Coconut Aloco: Replace the vegetable oil with coconut oil for a subtle coconut flavor that pairs well with the plantains.
  4. Herb-infused Aloco: Add fresh herbs like thyme or rosemary to the sautéed onion, garlic, and ginger for an aromatic twist.

Feel free to experiment with different ingredients and flavors to create your own signature Aloco recipe.

Serving suggestions and accompaniments for Aloco

Aloco can be enjoyed as a standalone dish or served as a side alongside other Ivorian delicacies. Here are a few serving suggestions and accompaniments to consider:

  1. Serve Aloco with grilled meat or fish for a complete and satisfying meal.
  2. Pair it with a fresh salad or steamed vegetables for a balanced and nutritious option.
  3. Top Aloco with a dollop of sour cream or yogurt for a creamy and tangy contrast.
  4. Enjoy it with a side of spicy tomato sauce or a squeeze of fresh lime juice for an extra burst of flavor.

Aloco is a versatile dish that complements a wide range of flavors and cuisines, so feel free to get creative with your accompaniments.

Health benefits of Aloco’s main ingredients

Aloco not only delights the taste buds but also offers several health benefits due to its main ingredients. Plantains, the star ingredient of Aloco, are a rich source of dietary fiber, vitamins A and C, and potassium. They promote healthy digestion, boost the immune system, and help regulate blood pressure. Additionally, plantains are low in fat and cholesterol, making them a healthy alternative to traditional fried snacks.

The spices used in Aloco, such as ginger and paprika, also offer numerous health benefits. Ginger has anti-inflammatory properties and aids in digestion, while paprika is rich in antioxidants and can help improve blood circulation. By incorporating these ingredients into your diet through Aloco, you can enjoy a delicious meal while reaping the nutritional benefits.

Where to find Aloco in Ivory Coast and beyond

If you find yourself in Ivory Coast, Aloco can be found in local restaurants, street food stalls, and markets throughout the country. It is a staple dish in Ivorian cuisine and is widely available. Be sure to try Aloco at different locations to experience the subtle variations in flavor and preparation methods.

If you’re not in Ivory Coast, you can still enjoy Aloco by preparing it in your own kitchen. The ingredients required for an authentic recipe are readily available in most grocery stores, making it easy to recreate this delightful dish no matter where you are in the world.

Tips and tricks for perfecting your Aloco recipe

To ensure your Aloco turns out perfectly every time, here are a few tips and tricks to keep in mind:

  1. Use ripe but firm plantains for the best texture and flavor.
  2. Be cautious when frying the plantains to avoid burning them. Adjust the heat as needed and keep a close eye on them.
  3. Drain the fried plantains on a paper towel-lined plate to remove excess oil and keep them crispy.
  4. Adjust the seasoning according to your taste preferences. Feel free to add more spices or salt and pepper as desired.
  5. Serve Aloco immediately after cooking to enjoy it at its best.

By following these tips, you can elevate your Aloco recipe and impress your family and friends with a delicious and authentic Ivorian dish.

Conclusion: Embrace the flavors of Ivory Coast with Aloco

Aloco is more than just a dish; it is a representation of the vibrant culture and culinary traditions of Ivory Coast. By discovering and preparing an authentic Aloco recipe, you can immerse yourself in the flavors and aromas of this West African nation. Whether you enjoy it as a standalone dish or alongside other Ivorian delicacies, Aloco is sure to leave a lasting impression on your taste buds. So, gather your ingredients, follow the step-by-step guide, and embark on a culinary journey to Ivory Coast with Aloco.

Note: This article is for informational purposes only. Please consult a healthcare professional or nutritionist for personalized dietary advice.

Can’t wait to try Aloco? Explore our collection of authentic African recipes and bring the flavors of the Black Continent to your kitchen!

Discover the Authentic Thieboudienne Recipe from Liberia: A Taste of West African Cuisine

Introduction to Thieboudienne: A traditional West African dish

Thieboudienne is a delicious and flavorful traditional dish that originates from West Africa, particularly Liberia. This dish is a staple in Liberian cuisine, and it offers a true taste of the region’s rich culinary heritage. Thieboudienne is a one-pot rice dish that is packed with aromatic spices, fresh vegetables, and tender fish or meat. Its unique combination of flavors and textures makes it a favorite among locals and a must-try for anyone looking to experience the authentic tastes of West Africa.

History and cultural significance of Thieboudienne in Liberia

Thieboudienne holds a special place in Liberian culture and is often considered the national dish of the country. The roots of this dish can be traced back to the Wolof people of Senegal, who brought it to Liberia during the transatlantic slave trade. Over the years, Thieboudienne has evolved and adapted to the local ingredients and cooking techniques, resulting in a unique version that is distinctively Liberian.

In Liberian culture, Thieboudienne is commonly served during special occasions and celebrations. It is a dish that brings people together, symbolizing unity and community. The process of preparing Thieboudienne is often a social affair, with family and friends gathering in the kitchen to chop vegetables, clean fish, and share stories. This communal aspect of cooking and sharing Thieboudienne reflects the warm and welcoming nature of Liberian culture.

Ingredients and quantity required for Thieboudienne

To make an authentic Thieboudienne, you will need the following ingredients:

  • 2 cups of long-grain rice
  • 1 pound of fish (such as red snapper or grouper), cleaned and cut into fillets
  • 1 onion, finely chopped
  • 2 cloves of garlic, minced
  • 1 teaspoon of ground ginger
  • 1 teaspoon of ground black pepper
  • 1 teaspoon of dried thyme
  • 2 tablespoons of tomato paste
  • 2 tablespoons of vegetable oil
  • 2 cups of water
  • 2 carrots, peeled and sliced
  • 1 eggplant, cut into cubes
  • 1 cabbage, chopped
  • 4 okra pods, sliced
  • Salt to taste

Step-by-step guide to cooking Thieboudienne

  1. Rinse the rice under cold water until the water runs clear. Drain and set aside.
  2. In a large pot, heat the vegetable oil over medium heat. Add the chopped onion and minced garlic, and sauté until fragrant.
  3. Add the tomato paste, ground ginger, ground black pepper, and dried thyme to the pot. Stir well to combine the ingredients.
  4. Add the fish fillets to the pot and cook for a few minutes on each side until they are lightly browned.
  5. Pour in the water and bring the mixture to a boil. Reduce the heat to low and let it simmer for about 10 minutes to allow the flavors to meld.
  6. Add the sliced carrots, cubed eggplant, chopped cabbage, and sliced okra to the pot. Stir well to distribute the ingredients evenly.
  7. Season with salt to taste and cover the pot. Let the Thieboudienne simmer for another 20-25 minutes, or until the vegetables are tender and the rice is cooked.
  8. Once the Thieboudienne is ready, remove it from the heat and let it sit for a few minutes before serving. This will allow the flavors to further develop.

Tips and tricks for perfecting the Thieboudienne recipe

  • Use fresh and high-quality ingredients to ensure the best flavors in your Thieboudienne.
  • Adjust the spices and seasonings according to your taste preferences. Feel free to add more or less of any ingredient to suit your palate.
  • For a vegetarian version of Thieboudienne, you can omit the fish and use vegetable stock instead of water for added flavor.
  • To enhance the smoky flavors of the dish, you can grill the fish fillets before adding them to the pot.
  • Serve Thieboudienne hot with a side of traditional Liberian hot sauce for an extra kick of heat.

Variations and regional adaptations of Thieboudienne

As Thieboudienne has spread throughout West Africa, different regions have added their own twists and variations to the dish. In Senegal, for example, Thieboudienne is often made with fish and served with a side of spicy tomato sauce called “dakhar.” In Gambia, Thieboudienne is typically made with smoked fish and served with a side of “benachin,” a flavorful rice dish.

In Liberia, Thieboudienne is traditionally made with fish, but you can also find versions with chicken or beef. Some people like to add additional vegetables such as bell peppers or green beans for extra color and flavor. Each regional adaptation of Thieboudienne offers a unique taste experience, showcasing the diverse culinary traditions of West Africa.

Health benefits of Thieboudienne

Thieboudienne is not only a delicious dish but also a nutritious one. It is packed with a variety of vegetables, which provide essential vitamins, minerals, and dietary fiber. The fish in Thieboudienne is a great source of lean protein and omega-3 fatty acids, which are beneficial for heart health.

The use of aromatic spices like ginger and thyme in Thieboudienne not only adds flavor but also offers various health benefits. Ginger is known for its anti-inflammatory properties, while thyme is rich in antioxidants. Overall, Thieboudienne is a well-rounded and wholesome meal that nourishes both the body and the soul.

Serving suggestions and accompaniments for Thieboudienne

Thieboudienne is often served as a standalone meal due to its hearty and filling nature. However, you can also pair it with a side salad or steamed vegetables for a lighter option. Traditionally, Thieboudienne is served with a side of homemade hot sauce, which adds a spicy kick to the dish.

For a complete West African dining experience, consider serving Thieboudienne alongside other traditional dishes such as Jollof rice, fried plantains, or grilled chicken. This will allow you to explore the diverse flavors of the region and create a memorable feast for your family and friends.

Where to find authentic Thieboudienne in Liberia

If you find yourself in Liberia and want to taste the most authentic and delicious Thieboudienne, head to the local markets and food stalls. These places are filled with vendors who specialize in traditional Liberian cuisine and serve up mouthwatering Thieboudienne. Be sure to look for stalls that are frequented by locals, as they are likely to offer the most authentic flavors and recipes.

Additionally, some restaurants in Liberia, especially those in the capital city of Monrovia, also feature Thieboudienne on their menus. These restaurants often offer a modern twist on the traditional dish, combining classic flavors with contemporary culinary techniques. Exploring the local food scene in Liberia will surely lead you to some hidden gems where you can indulge in the authentic taste of Thieboudienne.

Conclusion: Embrace the flavors of West Africa with Thieboudienne

Thieboudienne is more than just a dish; it is a culinary journey that allows you to experience the vibrant flavors and cultural richness of West Africa. From its humble origins to its significance in Liberian culture, Thieboudienne encapsulates the spirit of community, togetherness, and celebration.

Whether you try making Thieboudienne in your own kitchen or seek it out in Liberia, the authentic taste of this traditional dish will transport you to the heart of West Africa. So, embrace the flavors, gather your loved ones, and embark on a gastronomic adventure with Thieboudienne. You won’t be disappointed!

Sadza with Nyama Recipe From Zimbabwe

There’s a saying in Zimbabwe that “Sadza with Nyama is the heart of the meal,” and this couldn’t be more accurate. This iconic dish, a staple in Zimbabwean cuisine, has been nourishing families for generations. Sadza, a thick, smooth porridge made from cornmeal, combined with Nyama, a savory meat stew, creates a satisfying and flavorful dish that is both comforting and nourishing. It’s more than just a meal, it’s a celebration of Zimbabwean culture and tradition.

This simple yet hearty dish is a daily staple in Zimbabwean households and is also served during special occasions. It is often eaten by hand, with the Sadza used as a scoop for the Nyama. It’s a communal meal, best enjoyed shared around a table with family and friends. It symbolizes togetherness, warmth, and the rich culinary heritage of Zimbabwe.

In this article, we will explore the cultural significance of Sadza with Nyama, learn about its key ingredients, and walk through a detailed step-by-step guide on how to prepare this authentic Zimbabwean dish. We will also discuss some pro tips to perfect the Sadza with Nyama Recipe Zimbabwe, explore its variations, and delve into its nutritional benefits.

Sadza with Nyama holds a special place in Zimbabwean culture. It’s a dish that’s deeply embedded in the Zimbabwean way of life, a culinary tradition passed down from generation to generation. It is the epitome of Zimbabwean cuisine, its flavors and textures representing the country’s rich agricultural heritage.

Serving Sadza with Nyama is a sign of hospitality in Zimbabwe. It’s a dish prepared with love and care, and offering it to guests is a symbol of respect and friendship. Whether it’s a daily family meal, a gathering of friends, or a large community celebration, Sadza with Nyama is always on the menu.

Moreover, the preparation of Sadza with Nyama is a communal activity in Zimbabwe. Often, the women of the household or community come together to prepare the meal. This gathering around the pot is a time for sharing stories, laughter, and camaraderie, further cementing Sadza with Nyama’s role as a binder of community and tradition.

The beauty of Sadza with Nyama lies in its simplicity. This dish is made with easily accessible, wholesome ingredients that come together to create a filling and nutritious meal. The key ingredients for Sadza are cornmeal and water, while Nyama typically includes beef, onions, tomatoes, and a blend of spices.

To serve four, you will need:

  • 4 cups of cornmeal
  • 8 cups of water
  • 1kg of beef, cut into chunks
  • 2 onions, finely chopped
  • 4 tomatoes, chopped
  • 2 cloves of garlic, minced
  • 1 teaspoon of salt
  • 1 teaspoon of pepper
  • 2 tablespoons of vegetable oil

The quantities can be adjusted depending on the number of servings required. The beauty of Sadza with Nyama is its flexibility – you can add more vegetables or use different types of meat depending on your preference.

Making Sadza with Nyama is a labor of love, but the end result is absolutely worth it. Here is a detailed step-by-step guide to help you create this traditional Zimbabwean dish.

Preparing the Nyama:

  1. Heat the vegetable oil in a pot over medium heat. Add the onions and garlic and sauté until they are soft and golden.
  2. Add the beef to the pot and cook until it is browned on all sides.
  3. Add the tomatoes, salt, and pepper to the pot and stir to combine. Cover the pot and let it simmer for about an hour, or until the beef is tender.

Preparing the Sadza:

  1. Bring half of the water to a boil in a separate pot.
  2. Slowly add the cornmeal to the boiling water, stirring constantly to prevent lumps from forming.
  3. Continue to cook the Sadza over low heat, stirring regularly, until it thickens to a consistency similar to mashed potatoes.

Once both components of the dish are ready, serve the Sadza on a plate with the Nyama on top. Enjoy your authentic Sadza with Nyama Recipe Zimbabwe!

Tips and tricks for the perfect Sadza

While Sadza with Nyama is a straightforward dish to prepare, there are a few tips and tricks that can elevate your cooking to the next level.

Firstly, the key to a good Nyama is patience. Allow the meat to simmer slowly until it’s tender and the flavors have had time to meld together. Rushing this process can result in tough meat and a lack of depth in flavor.

Secondly, when it comes to the Sadza, the secret is in the stirring. Constant stirring prevents lumps and results in a smooth, creamy texture. It’s a bit of a workout, but your efforts will be rewarded with perfect Sadza.

Lastly, don’t be afraid to experiment with different spices in your Nyama. While the traditional recipe is relatively simple, adding spices such as paprika, cumin, or coriander can add a whole new dimension to your dish.

While beef is the traditional meat used in Nyama, you can substitute it with chicken, goat, or even fish. Each type of meat brings a unique flavor to the dish, allowing for a variety of tastes.

Vegetarian and Vegans variations for the Sadza

Vegetarians and vegans can also enjoy Sadza by replacing the Nyama with a vegetable stew. Common vegetables used include spinach, collard greens, okra, and pumpkin leaves, often cooked with peanut butter for added flavor.

Some people also like to add beans, peas, or groundnuts to their Sadza for extra protein. The possibilities are endless!

Sadza with Nyama is not just a tasty dish, it’s also packed with nutritional benefits. The cornmeal in Sadza is a good source of carbohydrates, providing energy for the body. It’s also low in fat and contains valuable vitamins and minerals such as Vitamin A, B vitamins, and iron.

The Nyama, on the other hand, provides a good amount of protein, which is essential for muscle growth and repair. When prepared with lean cuts of meat, Nyama can be a healthy component of a balanced diet.

Moreover, when vegetables are included in the Nyama, the dish becomes even more nutritious. Vegetables are packed with fiber, vitamins, and minerals, and can help to boost the overall nutritional value of the meal.

In Zimbabwe, Sadza with Nyama is often served with a side of greens, such as spinach or collard greens, and a tomato and onion salad. These sides add a fresh and vibrant contrast to the rich flavors of the Sadza and Nyama.

In terms of drinks, a traditional Zimbabwean beer known as Chibuku, made from sorghum and maize, is a popular choice. Alternatively, a robust red wine, such as a Cabernet Sauvignon or a Merlot, can also pair well with the meaty flavors of the Nyama.

Where to try the authentic Sadza in Zimbabwe

If you’re in Zimbabwe and want to try authentic Sadza with Nyama, you’re in luck. This dish is widely available in most restaurants and roadside food stalls throughout the country. In the capital city of Harare, places like Gava’s Restaurant and The Boma – Dinner & Drum Show are famous for their Sadza with Nyama.

But the best Sadza with Nyama is often found in the homes of Zimbabweans. It’s a dish that’s made with love and enjoyed in the company of family and friends, and experiencing it in this context is truly special.

Sadza with Nyama is a symbol of Zimbabwe’s culinary heritage, a dish that reflects the country’s rich culture and traditions. Its simple ingredients and straightforward preparation belie the depth of flavor and nourishment it provides.

Whether you’re in Zimbabwe or anywhere else in the world, we hope this guide inspires you to try making Sadza with Nyama at home. Embrace the spirit of Zimbabwean cuisine and enjoy this hearty, satisfying dish with your loved ones. As they say in Zimbabwe, “Eat, enjoy, and share the love!”